Just beautiful!
Birth of a book from Lamartis Publishing House on Vimeo.
{ Comments on this entry are closed }
bubbling enthusiasm for $arbitrary_topic
Just beautiful!
Birth of a book from Lamartis Publishing House on Vimeo.
{ Comments on this entry are closed }
For ages now I’ve been meaning to try the methyl cellulose (wallpaper paste) method of gluing backing paper on to fabric to make it suitable for bookbinding. Most fabric can’t be used un-backed because it’s too slippery to work easily with, it frays, and the glue will almost certainly bleed through thinner fabrics and ruin them. The way to deal with this is to adhere paper to the back of the fabric to provide a layer of protection between the fabric and the paste.
When I want to visit the Wyvern Bindery, they mentioned that they back fabrics using a heat set tissue, but so far I’ve been unable to find that online, and I’m not sure if it would work with a normal household iron anyway. I’ve experimented with backing paper using bookbinding paste, but it doesn’t adhere evenly leaving little bubbles of unglued fabric and the bond, even when dry, is weak so you can just tear the paper off.
For Argleton, I used archival spray mount, which is more even, doesn’t leech through if you don’t overdo it, and seems to adhere very well. Because it’s archival, it shouldn’t discolour the fabric. However, it does require a ventilated space and you get through a lot of waste paper.
So I thought I’d try this method, using methyl cellulose paste:
Having just tried it, I can promise you that it’s not as easy as he makes it look! I’ve learnt a few things through this morning’s experiment, so will share those points here as much for my own reference as anyone else’s!
1. He says to mix the methyl cellulose (MC) in a 1 part MC to 8 parts water ratio and let it sit for 20 minutes. Next time I will try 1:7 because it was very sloppy and wet, even after waiting for 20 minutes to let it all congeal.
2. MC goes hella lumpy if you’re not careful. Next time I will add the MC to the water, not the other way round.
3. I need a much higher quality paddle to apply the MC with.
4. A rolling pin wrapped in cling does an ok job, but I really need a proper rubber roller.
5. I used two thin Japanese papers around the 40 – 50gsm (annoyingly I’ve lost the note where I wrote down what they were), but they were both far too thin. The MC just soaked right through them and I very much doubt that they would provide much protection from paste.
6. The MC will pick up pigment from non-colourfast fabrics, so if you’re reusing the same batch to do multiple pieces of fabric, start with the lightest colours first.
7. It takes longer than a few hours to dry!
As for the results, the silk I backed has come out well with no marks despite the fact that I was worried the MC has soaked right through. I’ll see how it works up into a cover when pasted. However, it has no bubbles and has bonded fairly well, although if I really wanted to, I could probably rip the two layers apart.
The synthetic fabric I tried hasn’t bonded properly with the paper along one edge, so that’s going to have to be dealt with before I make it up into a cover. I suspect I didn’t use enough MC because I was worried it would ruin the fabric. Next time, I will use more. But other than that, it’s bonded without any bubbles or other problems. It has, however, curled horrendously which is quite annoying. Not sure if this is down to the fabric or the paper. More tests required!
I’ll update this post with photos soon!
{ Comments on this entry are closed }
I’ve been spending some time making notebooks recently and have finally got round to taking some photos of them.
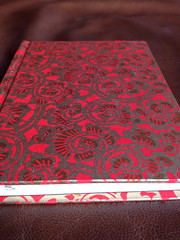
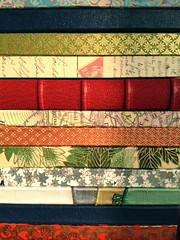
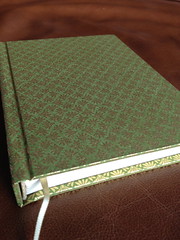
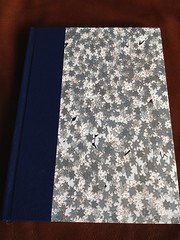
I’ve been using Chiyogami paper, block-printed Japanese paper that is very high quality indeed. It’s not cheap, but it’s gorgeous to work with. Because the paper fibres are randomly distributed, not aligned in parallel like most Western papers, the sheet won’t curl when it is pasted up.
The final photo above is a quarter-bound notebook, with the spine bound in bookcloth, in this case water-resistant bookcloth. Next week I’m going to pop into Falkiners whilst I’m in London to get some more colours as at the moment I only have dark blue and white, and I’m not a fan of the white as it tends to get dirty quickly and is a bit too see-through for my liking. Working the quarter-bound style like this does mean that you get to save a little on the expensive Chiyogami paper as you use less of it, and you can also bind in full bookcloth too, so I’m definitely going to invest in some more colours.
Five of these notebooks go to the winner of the Argleton geogame. The others I may put on Folksy. I have some more bookblocks to bind, which I’ll be doing as soon as I have a bit more spare time, and plenty of paper still to fold and sew!
I did actually buy a couple of reams of good A3 paper, but annoyingly discovered that the grain of the paper ran parallel to the short edge, instead of the long edge as I had hoped for. You usually fold parallel to the grain, which is fine if you’re doing an A6 book, because you’re cutting an A4 sheet in half, then folding it parallel to the grain. But for A5 that means folding an A4 sheet perpendicular to the grain, which is frowned upon.
Because the A3 paper I got is shortgrain instead of longgrain, that means that if I cut it to A4 size and fold, I’m still folding perpendicular to the grain. Most annoying! If I want to, I can trim it down to size so that the grain is going in the right direction, but that means weirdly shaped offcuts that aren’t massively useful for bookbinding. Meh. My search for cheap but decent paper continues.
Here’s a slideshow of all my notebook photos so far:
{ Comments on this entry are closed }
I’m in the process of planning my next Kickstarter project, which I’m hoping to have up early in March. This time, I’m trying to make sure that I really nail down my costs before I settle on my reward levels but this is proving to be trickier than anticipated! I want this time to offer a leather-bound version of the novelette, but in talking to various bookbinders, the answer to “How much does this cost?” appears to be “How much have you got?”.
The wide variation in options means that we can go from a very basic leather binding with nothing much more than a label on the spine to say what the book is and who wrote it, right the way up to complex bindings with inlays, gold tooling or gold-edged pages and everything in between. Before I can really know the price, I need to know what the design is but I won’t start the design work until I know that the project is going ahead. That creates a bit of a catch-22 situation as I need my costings to be as accurate as I can get them to ensure that I don’t end up under-budgeting.
Now, I have bound in leather once before and was chuffed as a small horse to hear from one of the bookbinders I met yesterday that my work is of a professional standard. Indeed, I was told that if I pitched up at this particular bindery with that as an example of my work, I’d be offered a job pretty much on the spot. It’s hard to express just how happy that made me as I obviously want to do as good a job as possible for my supporters!
At the moment (and for the foreseeable future), I don’t have the equipment needed to bind in leather. Once you start doing case bindings with a rounded spine, you start to need presses and other equipment that I both can’t afford and don’t have space for. But there is another option: to find a bindery that will allow me to hire space and provide a mentor under whose tutelage I can work so that I can make sure I don’t do anything wrong. That’s something I’ll be looking into over the next week or so, and it is my preferred solution. I adore making books, and working with leather is just a delight, not least because of the fabulous smell! And it would be a fantastic opportunity to hone my skills, so I am hoping that someone, somewhere does indeed go for a leather-bound hardback once the project is up online!
If you want to be amongst the very first people to know when Queen of the May goes live, join my mailing list and you’ll find out before anyone else!
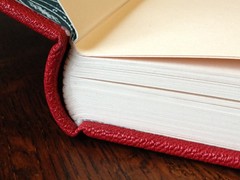
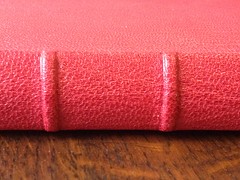
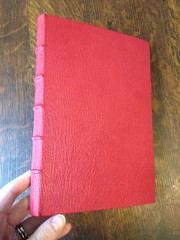
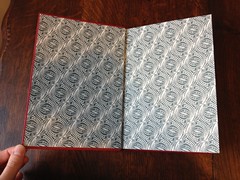
Meanwhile, to whet your appetite, some photos of the leather-bound journal I made:
{ Comments on this entry are closed }
It’s amazing how much you can achieve through creative procrastination. I finished up the first draft of my next novelette, currently titled Queen of the May although that might change. The transcription from my handwriting wasn’t too bad, but it has resulted in a lot of errors because my writing has a tendency to get a bit scrawly when I get over-excited. The first first draft came in at 21,673 words, a number which is steadily decreasing as I tidy up the copy.
But I have to confess that editing out weird typos is not exactly the most thrilling of pastimes, so I’ve been putting a lot of energy into planning my next Kickstarter project and, this time, getting my costings spot on. I’m talking to Oldacres in Hatton Garden again for printing as they did such a great job last time, and between us we’re trying to figure out how to do a better job on the paper cover for the hardback.
Last time, we used just normal paper stock with a laminate finish. It looked really good, but it was a bitch to work with when binding. Not only did I have to deal with the paper fibres swelling, as is their wont, but the lamination worsened the problem meaning that I had to tape down each sheet in order to work with it. Since then I’ve done a couple of bookbinding courses at Falkiners, both of which were fantastic. I learnt some new techniques and got to play with some materials that I’d never have used on my own, and that experience has altered my thinking on how to bind the next set of books.
Firstly, I want to use Japanese paper for the paper-covered hardbacks. Japanese paper is made differently to western paper and because its fibres are random, rather than being all lined up as in our usual paper, it doesn’t curl when wet. This makes it a joy to work with. Japanese papers are also stronger, so you can work with a thinner stock which allows you to get much crisper, cleaner lines. But when you buy decorative Japanese paper, it has usually been screen printed, so although we can buy white sheets, how we print it is something that we’re still trying to work on. Oldacres are currently experimenting for me with some samples from John Purcell Paper, a wholesaler. I am very anxiously awaiting the results!
Secondly, the methodology I used for the silk covers last year turned out to be horribly, painfully time-consuming. I translated my “design” into blocks of colour, cut the right shapes out from appropriately coloured dupion silk, bonded them together and then sewed over the joins with embroidery. A very time-consuming process. The embroidery alone took 16 hours per cover. Beautifully as they came out, I cannot go through that again! So now I’m looking at the possibility of screenprinting, or maybe just doing a simpler embroidered design. This is going to require some serious and careful thought as it will have a big impact on the cover design. (You’ll be glad to hear that I’m not going to be doing the design myself this time!)
I’m also looking into possibilities for a leather-bound version. I’m talking to a number of binderies about my options, both for them to provide the binding service, and to explore whether there is any way that I can work on the leather bindings myself, under supervision. Whilst I worked with leather in my second Falkiners course, I have neither the equipment or the experience to do the leather versions myself. BInding in leather, even if it’s just an A6 novelette, is going to be far from cheap, but the results will be stunning.
Soon, I’ll have my costings nailed down and then I’ll be in the right position to start my next Kickstarter project. I have had a few ideas for exclusive rewards that I’ll be listing, but their numbers will be very limited indeed. I’ll be announcing the project through my mailing list first so if you want to be amongst the first people to know when it goes live, join the mailing list now! I send out very few emails and I manage the list using Mailchimp so you can set your preferences for type of email and can unsubscribe at any time without any risk of your email address winding up in the wrong hands.
I’m very excited to be planning my second Kickstarter project. It’s been 18 months since I put Argleton up, and the Kickstarter community has expanded dramatically over that time, so I’m eager to see what sort of support it’s possible to get now. My goal will certainly have to be a bit higher than last time in order to pay for a designer and my time: If writing is to be sustainable, it has to provide me with a modest living, and I would be very happy indeed if it could do that independent of the behemoth that is Amazon.
In the meantime, though, there’s only so long I can put off doing that edit!
{ Comments on this entry are closed }
Whilst watching this video of John Carrera’s project to reprint the Pictorial Webster’s Dictionary, I spotted that he had a nifty little device for putting holes into his book signatures, making sewing large numbers of books much quicker and easier.

Does anyone know if it’s possible to buy a jig like this? Is this standard bookbinding gear? Or would I have to find someone to make it for me?
{ Comments on this entry are closed }
I’m reminded by Simon Goode of the the Rubáiyát of Omar Khayyám, a collection of translated poems by Persian poet, mathematician and astronomer, Omar Khayyám. In 1912, a version of the book was bound by London bookbinder Francis Sangorski, who had a bit of a thing for shiny. Simon summarises:
The book took more than two years work to produce, bound in full leather with inlays of silver satinwood and mahogany. The Rubáiyát featured more than 1,050 precious and semi-precious stones – rubies, topaz, garnet and turquoise.
The rest of the tragic story is explained in this video:
{ Comments on this entry are closed }
Maria Fischer has made a beautiful book where the illustrations are sewn in thread. She says:
the book is designed as a model of a dream about dreaming. Analogue to a dream, where pieces of reality are assembled to build a story, it brings different text excerpts together. They are connected by threads which tie in with certain key words. The threads visualise the confusion and fragileness of dreams.
It really is a beautiful piece of work – do go and have a look!
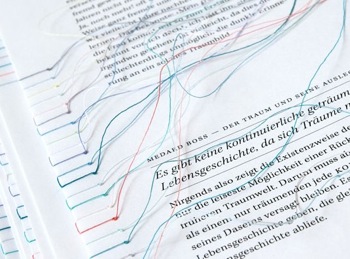
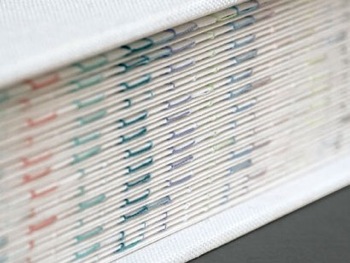
Thanks to Peter Harris for emailing me the link.
{ Comments on this entry are closed }
Last Wednesday’s inaugural Bookbinding Club, held at The Lamb on the wonderfully named Lambs Conduit Street, was a runaway success! Ben O’Steen and I were joined by about half a dozen others, and much beer, food and conversation was had. Not a bad turn-out, given that the weather was so vile.
I took a few of my notebooks and my most recent Argleton prototype to get some feedback. There may even be some pictures of said prototype floating about somewhere, as cameras were present! Overall, feedback was good, especially to the prototype, which made me very happy.
We did have a fairly heated discussion about whether or not some of my books were, and I quote, “wonky”. Certainly I’m aware that it can actually be quite hard to get a book to come out perfectly square, even if you’ve carefully measured everything out. Sometimes, it’s just a bit wonky. Ben contended, however, that wonkiness is part of the charm of hand-made books and that, in any case, the wonkiness I was complaining of was so minor as to be unnoticeable.
We’ve decided that our next meeting will be in two months, on the last Wednesday of November, 24th, and then again on the last Wednesday in January, 26th, conveniently skipping over that awkward Christmas period. It’ll be at The Lamb again, 6pm. If you’d like to come along to the next meeting, here’s an Eventbrite page to sign up to. You don’t need to – you can just decide to come along on the night – but if you do it’ll give us an idea of numbers.
The theme for the next meeting will be paper! Please do bring along samples of paper, whether for covers, construction, endpapers, or book blocks, to discuss. We look forward to hearing about your favourite paper. I’m hoping that, by November, I’ll have finally found a good, affordable paper for making fountain-pen friendly notebooks. If so, I shall certainly share!
{ Comments on this entry are closed }
Inspired by the wonderousness of The Stationery Club, Ben O’Steen and I have decided to run our own Bookbinding Club. We’re going to get together at 6pm on Wednesday 29 September at The Lamb on Lambs Conduit Street for our inaugural meeting.
Anyone who is interested in bookbinding, whether or not they practice, is welcome. If you’re curious about how books are made, just beginning to make your own (that’ll be me then!) or an expert, we would be delighted to see you.
Each get together will be themed, so for this first one, please do bring along any projects you have that you’re in the middle of, stuck on, or have finished for us to discuss. And if you’re a beginner, we’ll talk about how to make a simple book so you can go home and get started!
You’ll easily be able to spot us – we’ll be the people sat with the piles of books and stationery out on the table! If you’re coming, please feel free to leave a comment here so that we can get an idea of numbers.
{ Comments on this entry are closed }

If you’re interested in writing, books and cats, subscribe now to Word Count, my weekly round-up of mews, news and reviews and get my free urban fantasy novella, The Gates of Balawat.

Matt is fascinated by the story of Argleton, the unreal town that appeared on GeoMaps but which doesn’t actually exist. When he and his friend and flatmate Charlie are standing at the exact longitude and latitude that defines Argleton, Matt sets in motion a chain of events that will take him places he didn’t know existed… and which perhaps don’t.

From the identification of the Horsehead Nebula to the creation of the computer program, from the development of in vitro fertilisation to the detection of pulsars, A Passion for Science: Stories of Discovery and Invention brings together inspiring stories of how we achieved some of the most important breakthroughs in science and technology.
If you’d like to write more than you currently are, whatever you’re writing and why ever you’re feeling stuck, then my newsletter Why Aren’t I Writing? is for you!

Every year, on May Day, a young woman is stolen away by the faeries to become their Queen for a year. This year, though, the faeries have bitten off more than they can chew. Shakti Nayar will do whatever it takes to get her own life as a botanist back. As she struggles to work out how to get home, she uncovers Faerie’s dark secret and finds that she is not the only human who needs saving.